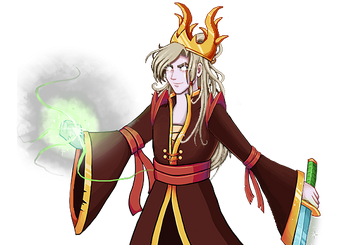
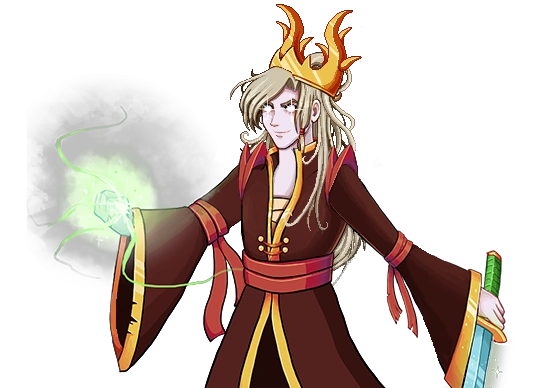
Zhamla Meer is a boss fought in the later area of Tai Ming. A master collector and holder of a great many artifacts and cards; Zhamla Meer is a dangerous foe. Luckily, you aren't alone in this fight. The Elders and Priestess' are helping you to seal away this dangerous threat. He is encountered in the Zen Garden in Tai Ming.
Story:[]
As the Player makes their way into the Tai Ming Temple they eventually reach the inner Gardens. Upon entering the Zen Gardens the player will come across a locked door and an orb upon an altar. Examining the orb begins a cutscene in which the player is cast into the past and must hold off the insane Zhamla Meer, Corrupt Collector, while the Priests and Tessen attempt to seal him away. After succeeding in the battle, Zhamla is sealed away and the player can continue their quest for the artifact of Tai Ming.
Abilities:[]
Rising Slash:[]
Zhamla will move to the edge of the arena and prepare for this attack. He will then move swiftly across the arena in a horizontal slash. He will do this up to 3 times and will often do this between his other attacks.
Steel Strike:[]
Zhamla will mark the Player with Doom before launching his sword in a spinning strike to hit the Player. The sword will remain in the ground until Zhamla picks it up again.
Meteor Crash:[]
Glowing with a red energy, Zhamla will summon shrinking red targets in a variety of areas in the arena. Once these targets disappear, the area will be hit by a meteor. As well as the initial impact, the area will also start to burn and should the Player touch the burning areas; they too will be set alight and take repeated fire damage for a short while.
Stormy Wrath:[]
Glowing with a lighter green energy, Zhamla will summon an array of small green discharges around the arena. After a moment, the charges will be struck by lightning. This attack will occur 3 times in succession and in differing locations.
Frozen Ground:[]
Glowing with a blue energy, Zhamla will move to the centre of the battlefield and freeze a large area around him solid. This makes his attacks significantly harder to dodge due to the slippery floor but will thaw given time.
Standing Stone:[]
Glowing with a darker green energy, Zhamla creates cracks in the very earth around him. After a few moment, the cracks will erupt in standing stone pillars. The main intention with this attack is to limit your movements making it easier for Zhamla to corner you. You can attack the pillars to remove them.
Special: Extinguished Light:[]
Using his incredible power and our friend Amalet; Zhamla will assault the player with a bullet hell-style attack. Moving to the top centre of the area, he will pull out Amalet to initiate the attack. The attack consists of three bullet patterns. The first is the main form that consists of a ring of arrow bullets with a gap in the chain. These move towards the bottom of the arena as well as rotate. The second are orbs which start around Zhamla but will then explode into a ring of smaller orbs and follow a similar pattern to the main part of the attack. These don't have a missing bullet in the ring but the gaps between them grow larger as this part of the attack continues. The third and final part of the attack is creating a ring of shard bullets which will be aimed at the player and will cross over themselves when they near the location of the player. This attack will go on for a short while before the regular attacks re-occur.
Strategy:[]
The most important part of this fight is understanding what is happening. Zhamla is far too strong to be fought head on and thus, the Priests are trying to seal him away. What you need to do is focus on defending and evading his attacks to waste his time and allow the exorcism to be complete. The next most important thing is to watch the tells he gives for his attacks. The colour of Gaan'tlet dictates which of his attacks are being used. Move out of the way of the targets Zhamla places down and you should be avoid most of his attacks. If you feel like the Standing Stone attack is causing movement issues then try and use the charge up time between his attacks to clear some of the pillars to give more breathing room. If he moves to the direct centre of the arena then he will use Frozen Ground so move to the left or right of the arena to avoid being caught. The real trick with this attack is that his Rising Slash attacks come from the edges and will force you to either have little control but more time to react in the centre or force you to have a short amount of time to react to his attacks. To try and get around this, when he moves to one side, move immediately to the other as soon as you see which way he is moving. This will give you the most time to dodge his attacks. Finally, Extinguishing Light. If you had no trouble with the Cursed Priestess fight then this attack should be quite familiar to you. Simply avoid the bullets to the best of your ability and try to keep a good distance from him due to the speed at which the shard bullets move. If you do get hit, then use your invincibility to get to a safer spot.
A good tip for this fight is to have the Barrier Skill as this fight is primarily a defensive encounter. If you use this then stay well away from many fire, especially the Meteor Crash impacts, as they will burn through your barrier very quickly and force you to be at a disadvantage waiting for it to recharge.
")